Modify Company Information allows you to set up your email preferences and select other options. There are three tabs: Company Information, Email Information, and Form Printing.
This Section Includes:
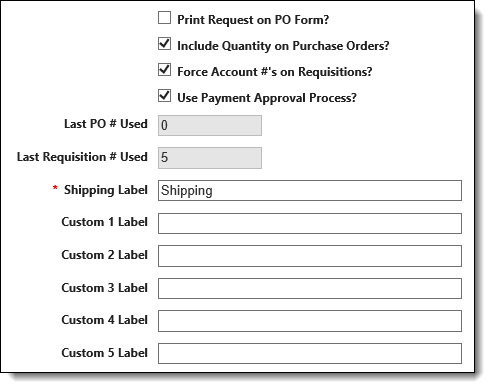
The Company Information Tab allows you to customize options for your company. The following check boxes are available at the top of this page.
•Print Request on PO Form: This option prints unapproved requests on purchase order forms. If this option is checked, then a PO Form is generated after clicking the Print button on the Manage > Requests page. If not, then the normal Request List is generated.
•Include Quantity on Purchase Orders: Select this option to have the Qty, Unit, and Unit Price fields appear on the Detail tab when entering a Request.
•Force Account #s on Requisitions: Select this option if you want each Request to have account numbers assigned to the detail lines. If this option is not selected, then Requests can be created without specifying an account number. The account number still has to be entered before the Request can be approved.
•Use Payment Approval Process: Select this option to activate the optional payment approval feature. The last Purchase Order number used and the last Requisition number used are displayed for your reference. (The values in these fields cannot be changed). See Payment Approval Process for more information.
oCreate Invoice in Accounts Payable: use this option to create an Accounts Payable transaction and post it in Accounts Payable > Manage >Unposted Transactions upon Purchasing Management’s action to authorize payment.
The Accounts Payable person can simply select the approved transactions and post, or if necessary, review and make changes before updating General Ledger.
•Last PO # Used: Displays the last purchase order number used.
•Last Requisition # Used: Displays the last requisition number used.
•You can also customize the Shipping Label and five Custom Labels for use with a custom form. This affects the labeling of the Shipping field and the fields on the Headings tab when entering a new Requisition.
|
|
If you do not wish to use a Custom field just leave the Custom Labels field blank. If all of them are blank, the Headings tab no longer appears when entering new Requisitions. |
You can select from the following options:
•Email All Approvers when Requisition is created : Select this option and the program emails all individuals in the selected Approval Path every time a Requisition is created.
•Email Next Approval: Select this option and the program emails the next individual in the approval process at every stage.
•Email Approved or Rejected: Select this option and the program sends the creator of the Requisition an email notification and a link to the Purchase Order when the Requisition is rejected or receives final approval.
•Email Purchase Order to Vendor: Select this option and the program sends the associated Vendor an HTML copy of the Purchase Order when it is approved.
The Check Request Email field allows you to specify an address to notify when a Check Request is approved.
The Email From Name field allows you to enter who you want emails to read as being 'From' for all Purchasing Management notification emails.
|
|
Email Configuration
You must configure SMTP server settings in the Email Configuration Utility before Purchase Order is able to send emails (More Information). Email addresses must be set up on Vendor records within Accounts Payable (More Information) and users must have their accounts linked to a vendor. |
|
|
Customers who are self-hosted cannot email notifications unless the user agent is configured properly. Please reference How to Use User Agents in the Financials for instructions. |
Select one of the Default Form options and click Test Printed Form to preview what your form looks like. Alternately, you can select Custom Form and click the Choose File button to select the custom form that you wish to use. If there is already a custom form selected you can click the Edit ![]() icon and then the Choose File button to select a new custom form. The custom form needs to be in HTML format. The following fields are available:
icon and then the Choose File button to select a new custom form. The custom form needs to be in HTML format. The following fields are available:
(1).png)
|
|
The FldShippingFld and FldCustom1Fld-FldCustom5Fld fields refer to the custom labels entered when creating a new Requisition. |
Click the Download Form button to download a copy of the currently selected form. When finished click the Update button to save all changes, the Reset link to undo all changes since the last time Company Information was updated, or the Cancel link to return to the main Purchasing Management page without saving.